VMware Hard Disk Optimization (Windows 10 PVSCSI)
In VMware Workstation Player 16, when the virtual machine is Windows 10, NVMe is specified as the default device of the hard disk, but as a result of verification, PVSCSI is superior in high throughput and low CPU occupancy. I found out that there is. Here are the steps to migrate to PVSCSI.
See below .
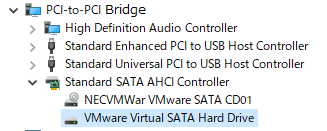
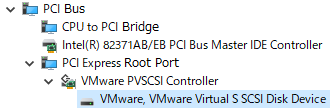
pmp-style-en.hatenablog.com If you are not familiar with it, be sure to copy the entire virtual machine and back it up before starting work. We cannot take responsibility even if it becomes impossible to recover. The vmx file is in text format and has independent settings for each line. (1). Open the edit screen of the virtual machine and check the interface of the HDD. If you are already SATA, proceed to Step3. (2). Open the vmx file in an editor, comment out the device you are using for the system drive, and connect the system drive to SATA. Before modification After correction (3). Start the virtual machine and check that the HDD is connected by SATA in Device Manager. (1). Add a new SCSI HDD from the virtual machine settings. The minimum capacity is 1G. At this time, enter the name of the HDD image file, so use a descriptive name such as dummy_scsi.vmdk. (5). Shut down the virtual machine. (6). Open the VMX file in an editor and change the SCSI device to PVSCSI. Before modification After correction (7). Start the virtual machine (8). Make sure that the SCSI-HDD is registered under "VMware PV SCSI Controller" in Device Manager. (9). Shut down the virtual machine (1). Open the VMX file in an editor and change the system drive to PVSCSI. Before modification After correction This fix changes the system drive from SATA to PVSCSI and leaves the dummy SCSI drive unconnected. (2). Start the virtual machine. You may get a blue screen with the error "INACCESSIBLE BOOT DEVICE". The same screen will appear even after restarting, and the following screen will be displayed at the third startup. Press "F4" to boot into safe mode.
Now that you can start Windows, please restart it. Now you can start it normally. (3). Make sure that the SCSI-HDD is registered under "VMware PV SCSI Controller" in Device Manager. This completes the PVSCSI conversion of the system drive. (4). The dummy_scsi.vmdk added as a dummy is not used, so delete it. I've never seen this phenomenon before, and I've only seen it with a combination of VMware Workstation Player 16 and Windows 10 20H2. At first, I didn't know how to recover, but I'm relieved to start it in safe mode. The mystery is only deepening. If anyone knows, please let me know. 
1. Overview
2. Caution
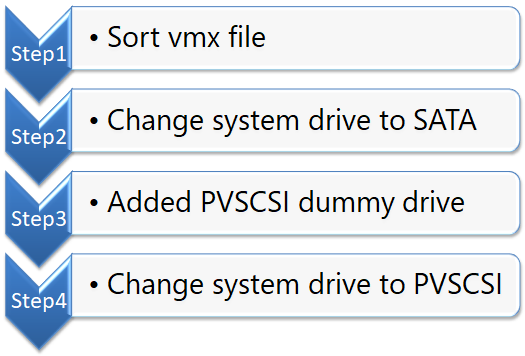
3.Overall flow
4. Detailed procedure
Step1. Sort VMX file
There is no context in the lines, but keep the same devices in the same place.
Open a command prompt and do the following:sort < VirtualMachineName.vmx > VirtualMachineName2.vmx
ren VirtualMachineName.vmx VirtualMachineName.org
ren VirtualMachineName2.vmx VirtualMachineName.vmx
Step2. Change system drive to SATA
First, change the HDD interface to SATA. Eventually I changed to PVSCSI, but when I changed to PVSCSI directly from NVMe, it sometimes failed, so migrating from SATA to PVSCSI went smoothly. It's a rule of thumb. Rest assured that the HDD image will not be damaged even if you make a mistake. 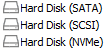
The following is an example of changing from NVMe to SATA. Please replace the file name. nvme0.present = "TRUE"
nvme0:0.present = "TRUE"
nvme0:0.fileName = "win10.vmdk"
nvme0:0.redo = ""
nvme0.pciSlotNumber = "256"
#nvme0.present = "TRUE"
#nvme0:0.present = "TRUE"
#nvme0:0.fileName = "win10.vmdk"
#nvme0:0.redo = ""
#nvme0.pciSlotNumber = "256"

sata0:0.present = "TRUE"
sata0:0.fileName = "win10.vmdk"
Step3. Added PVSCSI dummy drive
(2). Start the virtual machine
(3). In Disk Management, initialize the SCSI HDD and check that it can be accessed.
(4). Confirm that his SCSI-HDD is registered under "LSI SAS 1068" in Device Manager. 
scsi0.virtualDev = "lsisas1068"
scsi0.virtualDev = "pvscsi"
Step4. Change system drive to PVSCSI
sata0:0.fileName = "win10.vmdk"
sata0:0.present = "TRUE"
sata0:0.redo = ""

scsi0:0.fileName = "dummy_scsi.vmdk"
#sata0:0.fileName = "win10.vmdk"
#sata0:0.present = "TRUE"
#sata0:0.redo = ""

scsi0:0.fileName = "win10.vmdk"

Now press "F8" 


Finally
About the blue screen phenomenon of "INACCESSIBLE BOOT DEVICE"
This error occurs when the OS cannot boot without the device driver for the system drive. In order to avoid this error, I registered a dummy PVSCSI drive and made the OS recognize PVSCSI, so it is strange that an error occurs. When I saw that it was fixed in safe mode, I thought it was because of the fast boot mode, but for some reason the setting item was not displayed in the virtual machine.
On the other hand, this does not happen when changing from PVSCSI or NVMe to his SATA. Therefore, I am using the method of changing to SATA first.